
The General MM9 is a versatile instrument designed for accurate moisture content measurement in various materials. This manual guides users through its features and operation.
Key benefits include quick readings, selectable modes, and material-specific settings, ensuring reliable results for professionals and DIY enthusiasts alike.
Intended applications span woodworking, construction, and restoration, aiding in assessing wood, drywall, cement board, and other building materials for moisture issues.
What is the General MM9?
The General MM9 Moisture Meter is a professional-grade handheld device engineered for rapid and non-destructive assessment of moisture levels in a diverse range of materials. It’s a dual-mode meter, offering both pin and pinless technology to cater to various testing scenarios and material types. This flexibility makes it an invaluable tool for professionals in building construction, woodworking, flooring installation, and water damage restoration.
At its core, the MM9 provides both quantitative and qualitative data. In pin mode, it delivers a precise numerical reading of moisture content, while pinless mode offers a relative moisture indication (REL) alongside material-specific settings. The device is designed for ease of use, featuring an intuitive display and simple calibration procedures. It’s built to withstand the demands of job site environments, providing reliable performance and accurate measurements when needed most. Auto-calibration upon power-up ensures consistent accuracy.

Key Features and Benefits
The General MM9 boasts several key features enhancing its usability and accuracy. Dual measurement modes – pin and pinless – provide versatility for diverse applications, minimizing surface damage with the non-invasive pinless option. Dedicated settings for wood, drywall, and cement board ensure optimized readings for specific materials.
Benefits include rapid measurement capabilities, allowing for quick assessment of large areas. The clear, easy-to-read display presents moisture levels numerically (pin mode) or relatively (pinless mode), alongside operational indicators. Auto-calibration upon power-up simplifies operation and maintains accuracy. A low battery indicator prevents unexpected interruptions. Its robust construction ensures durability in demanding work environments. The MM9 empowers users to proactively identify and address moisture-related issues, preventing costly damage and ensuring project success.
Intended Use and Applications
The General MM9 is primarily intended for professionals and DIYers needing to assess moisture content in building materials and wood. Common applications include verifying the dryness of wood before finishing, detecting leaks in structures, and evaluating the moisture levels in drywall before painting or tiling.
Specific uses span carpentry, flooring installation, roofing, and water damage restoration. It’s invaluable for inspecting newly delivered lumber, ensuring proper kiln-drying. In construction, it aids in identifying potential mold growth areas. Restoration professionals utilize it to monitor drying progress after water damage. The MM9’s versatility extends to inspecting cement board, crucial for tile installation. Ultimately, it’s a vital tool for maintaining structural integrity and preventing material failures caused by excessive moisture.

Understanding the MM9 Display
The MM9’s display provides crucial information, including moisture level readouts, operating mode indicators (pin or pinless), and battery status for optimal use.
Display Indications: A Comprehensive Guide
The General MM9 display utilizes several indicators to convey information about the measurement process and device status. A three-digit value represents the moisture level when operating in pin mode, while “REL” appears during pinless mode operation. Specific icons denote the target material – wood, building material, hardwood, softwood, cement board, or drywall – clarifying the current measurement setting.
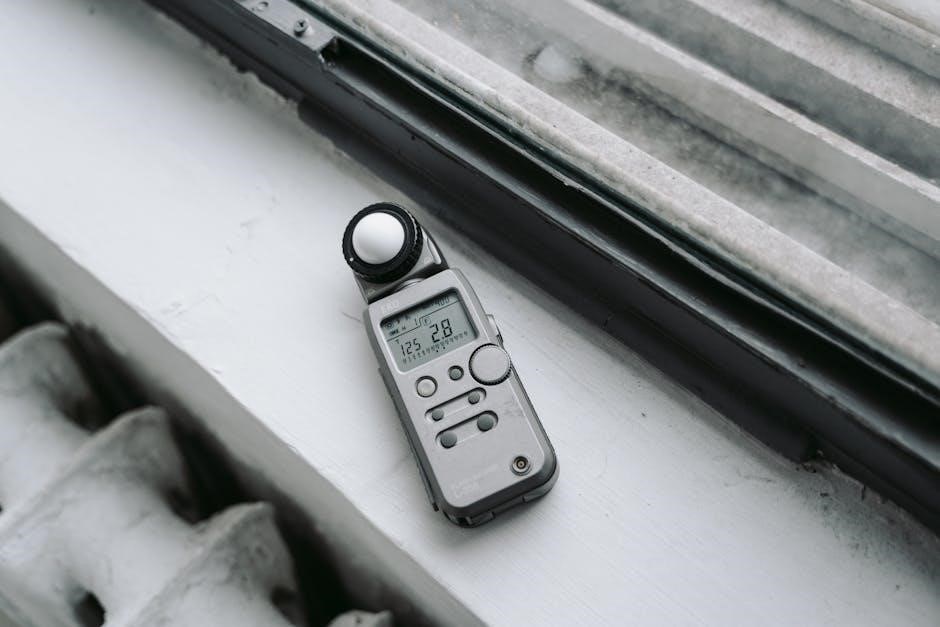
Additional indicators include symbols for pin mode operation, differentiating between wood and building material targets. A low battery icon alerts the user to replace the battery, ensuring continued accurate readings. Understanding these display indications is crucial for interpreting results correctly and maximizing the meter’s functionality. The display provides a clear and concise overview of the ongoing measurement, aiding in efficient and reliable moisture assessment.
Moisture Level Readout (Pin Mode)
In pin mode, the General MM9 displays moisture content as a three-digit numerical value. This reading directly corresponds to the percentage of moisture present in the material being tested, offering a precise measurement. The meter automatically adjusts the scale based on the selected material setting (wood or building material), ensuring accurate interpretation of the results.
It’s important to note that pin mode requires inserting the pins into the target material. The depth of insertion and pin angle influence the reading, so consistent technique is vital. Higher values indicate greater moisture content, while lower values suggest drier conditions. This direct measurement method provides a reliable assessment of moisture levels within the material’s structure, crucial for identifying potential issues.
Moisture Level Readout (Pinless Mode ⎯ REL)
When operating in pinless mode, the General MM9’s display shows “REL” instead of a numerical moisture percentage. This indicates a relative moisture reading, representing the moisture content within a specific depth below the sensor surface. The “REL” value isn’t a direct percentage but a comparative index, useful for identifying moisture variations across a material.
Understanding REL readings requires experience and familiarity with the material being tested. Higher REL values suggest increased moisture, while lower values indicate drier conditions. Pinless mode is ideal for quickly surveying large areas without causing damage, but it’s less precise than pin mode. The meter automatically adjusts the sensitivity based on the selected hardwood, softwood, cement board, or drywall setting, aiding in accurate relative assessments.
Operating Modes: Pin vs. Pinless
The MM9 offers two modes: pin and pinless. Pin mode provides precise, localized readings, while pinless mode offers rapid, non-destructive surface scans for broader assessments.
Pin Mode Operation: Wood Targets
For wood measurements in pin mode, firmly press the pins perpendicularly into the material. Ensure sufficient pin penetration for an accurate reading, typically halfway through the wood’s thickness.
The MM9 automatically detects wood targets, displaying a wood icon on the screen. Readings are presented as a percentage (%) of moisture content, reflecting the water present within the wood fibers.
Consider wood grain direction; readings taken across the grain may differ from those taken with the grain. Multiple readings at different locations are recommended to obtain a representative average moisture level.
Be mindful of surface checks or coatings, as these can influence readings. If necessary, lightly sand the surface to expose fresh wood before testing. The displayed WME (Wood Moisture Equivalent) value indicates the moisture level.
Always recalibrate if changing wood species or experiencing inconsistent results, ensuring the meter’s accuracy for reliable wood moisture assessment.
Pin Mode Operation: Building Material Targets
When measuring building materials like drywall or cement board in pin mode, press the pins firmly into the surface. The MM9 will indicate operation in pin mode for building materials with a specific icon.
Readings are displayed as a percentage (%) representing the moisture content within the material. Ensure the pins penetrate sufficiently to obtain a representative sample, avoiding surface coatings or films.
For layered materials, take readings at multiple depths to assess moisture distribution. Be cautious when measuring thin materials, as pin penetration can affect accuracy.
The displayed WME value (Water Material Equivalent) provides an indication of moisture levels. Remember that building materials may exhibit different moisture absorption characteristics.
Regular calibration is crucial for maintaining accuracy when working with diverse building materials. Always check calibration before and after measuring different material types.
Pinless Mode Operation: Hardwood
For hardwood measurements in pinless mode, firmly place the sensor surface against the wood. The MM9 will display an icon indicating operation in pinless mode specifically for hardwood targets.
Readings are shown as “REL”, a relative scale indicating moisture levels. This mode measures moisture gradients beneath the surface without causing damage.
Ensure good contact between the sensor and the wood surface for accurate readings. Variations in surface texture or finish can influence results, so test multiple spots.
Hardwood density affects pinless readings; denser woods may require longer scan times. The MM9 automatically adjusts, but understanding wood properties is beneficial.
Calibration is essential for reliable hardwood measurements; Regularly check and recalibrate the device, especially when switching between hardwood species.
Pinless Mode Operation: Softwood
When measuring softwood using the pinless mode, position the sensor flat against the wood surface. The MM9 display will show an icon confirming operation in pinless mode for softwood.
The readout displays “REL”, representing a relative moisture level. This non-destructive method detects moisture beneath the surface without causing physical penetration.
Consistent contact is crucial for accurate softwood readings. Uneven surfaces or coatings can affect results, so multiple scans across the area are recommended.
Softwood’s porous nature means readings can be influenced by ambient humidity. Allow the wood to stabilize before testing for optimal accuracy.
Regular calibration is vital for dependable softwood measurements. Recalibrate the device, particularly when transitioning between different softwood types, to maintain precision.
Calibration Procedures
The MM9 automatically calibrates upon power-up, but manual checks and recalibration are possible in both pin and pinless modes for enhanced accuracy.
Auto-Calibration on Power-Up
The General MM9 moisture meter features an automatic calibration function that initiates every time the device is powered on. This built-in process ensures the meter begins each measurement session with a standardized baseline, contributing to reliable and consistent readings. Upon activation, the meter internally assesses its sensors and adjusts accordingly, compensating for minor fluctuations due to temperature or internal component variations.
This auto-calibration is a crucial aspect of the MM9’s user-friendly design, minimizing the need for frequent manual calibration by the operator. It streamlines the workflow, allowing users to quickly begin assessing moisture levels without preliminary setup. While manual calibration options are available for fine-tuning, the automatic function provides a solid foundation for accurate measurements in most standard applications. The process is seamless and occurs within seconds of powering on the device, indicated by a brief stabilization period on the display.
Manual Calibration in Pin Mode
For pin mode calibration, the General MM9 requires a known, dry wood sample for accurate adjustment. This process verifies the meter’s readings against a reliable standard, ensuring optimal performance. To initiate, select pin mode and insert the pins firmly into the dry wood sample. Observe the moisture reading displayed; ideally, it should register close to zero.
If the reading deviates significantly, a manual calibration is necessary. Hold the power button for at least three seconds to enter calibration mode. The display will prompt you to confirm the zero-moisture reference. Adjust the reading using the up/down buttons until it aligns with the known dry sample. Confirm the calibration, and the meter will store the new reference point.
Regular manual calibration, especially when transitioning between environments or after prolonged storage, maintains the MM9’s precision and reliability in pin mode measurements.
Manual Calibration in Pinless Mode
Calibrating the MM9 in pinless mode demands a non-conductive, flat surface as a reference point. Unlike pin mode, this process doesn’t rely on direct penetration but assesses moisture through dielectric properties. Begin by selecting the appropriate material setting – hardwood, softwood, drywall, or cement board – relevant to your calibration needs.
Place the meter’s sensor firmly against the reference surface. Initiate calibration by holding the power button for three seconds; the display will indicate calibration mode. Adjust the reading using the up/down buttons until it aligns with a known dry standard for that specific material. Confirm the calibration, and the MM9 will store the adjusted settings.
Periodic manual calibration in pinless mode ensures consistent and accurate readings, particularly when working with diverse materials and varying environmental conditions.

Powering the MM9 and Battery Management
To power on, press and hold the power button; to power off, repeat the process. A low battery indicator signals the need for replacement.
The MM9 utilizes a 9V battery, ensuring reliable operation and extended use for moisture measurement tasks.
Powering On and Off the Device
Initiating Operation: To activate the General MM9 moisture meter, locate the power button on the device’s face. Press and hold this button for approximately three seconds. Upon successful activation, the LCD display will illuminate, initiating a self-calibration sequence. This auto-calibration ensures accurate readings from the outset of each use.
Display During Startup: During the self-calibration phase, the display may briefly show various indicators or a series of numbers. This is a normal part of the startup process and signifies the meter is preparing for operation. Allow the calibration to complete before taking any measurements.
Terminating Operation: To deactivate the MM9 and conserve battery life, press and hold the power button again for at least three seconds. The display will darken, indicating the device has been powered off. Ensure the meter is completely powered down when not in use to prevent accidental battery drain.
Automatic Power-Off: The MM9 also features an automatic power-off function. If the device remains idle for a prolonged period (typically several minutes), it will automatically shut down to conserve battery power. This feature is designed to enhance usability and extend battery lifespan.
Low Battery Indication and Replacement
Recognizing Low Power: The General MM9 provides a clear visual indication when the battery charge is insufficient for accurate operation. A low battery symbol, typically represented by a battery icon with diminishing segments, will appear on the LCD display. This serves as a prompt to replace the battery promptly.
Battery Access: To access the battery compartment, locate the battery cover, usually on the back or bottom of the device. Depending on the design, this cover may be secured by a screw or a sliding latch. Carefully open the compartment to reveal the battery.
Replacement Procedure: Remove the depleted battery and replace it with a fresh battery of the correct type (see ‘Battery Type and Specifications’). Ensure correct polarity alignment – positive (+) and negative (-) terminals must match the markings inside the compartment.
Post-Replacement Check: After installing the new battery, close the battery compartment securely. The low battery indicator should disappear upon powering on the device, confirming successful battery replacement and restoring full functionality.
Battery Type and Specifications
Required Battery: The General MM9 moisture meter is designed to operate with a 9-volt (9V) battery. Using any other battery type may result in inaccurate readings or damage to the device. It’s crucial to adhere to this specification for optimal performance and longevity.
Recommended Battery Chemistry: While standard alkaline 9V batteries are suitable, lithium 9V batteries are recommended for extended use and superior performance, particularly in colder temperatures. Lithium batteries offer a longer lifespan and more stable voltage output.
Voltage Range: The acceptable voltage range for the 9V battery is typically between 7.2V and 9.6V. Batteries falling outside this range should be replaced, as they may not provide sufficient power for accurate measurements.
Disposal Considerations: Dispose of used batteries responsibly, following local regulations for battery recycling and disposal. Do not incinerate or dispose of batteries in general waste.

Specific Material Settings
The MM9 offers pre-programmed settings for cement board and drywall, enhancing accuracy. These settings optimize readings for each material’s unique properties and composition.
Cement Board Settings
Utilizing the cement board setting on the General MM9 ensures precise moisture readings specifically tailored for this building material. When operating in pinless mode, selecting the cement board icon (identified as ‘J’ in the display indications) is crucial for accurate assessment.
This setting accounts for the unique density and composition of cement board, which differs significantly from wood or drywall. Without this specific calibration, readings may be misleading, potentially leading to incorrect conclusions about moisture levels;
To activate the cement board setting, navigate to pinless mode and cycle through the material options until the cement board icon is illuminated on the display. Ensure the meter is firmly pressed against the surface of the cement board for a stable and reliable reading. Remember that surface conditions can influence results, so test multiple areas.
Proper use of this setting is vital for identifying potential issues like water damage or incomplete drying, contributing to sound construction practices and preventing future problems.
Drywall Settings
The General MM9’s drywall setting is specifically designed to provide accurate moisture readings when assessing gypsum board. In pinless mode, activating the drywall icon (labeled ‘K’ in the display indications) is essential for reliable results.
Drywall’s porous nature and composition necessitate a dedicated calibration. Using a generic setting can lead to inaccurate assessments, potentially overlooking hidden moisture issues or falsely indicating problems.
To select the drywall setting, enter pinless mode and cycle through the material options until the drywall icon illuminates on the display. Maintain firm, consistent contact between the meter and the drywall surface during measurement. Multiple readings across different areas are recommended for a comprehensive evaluation.
Correctly utilizing this setting helps identify potential water leaks, improper installation, or incomplete drying, contributing to a healthy and structurally sound building environment.
Troubleshooting Common Issues
If the display is blank, check the battery. For inaccurate readings, ensure proper calibration and material settings are selected before each measurement attempt.
No Display or Power
If the General MM9 fails to power on, the most common cause is a depleted battery. Begin by verifying the battery compartment is securely closed and that the battery is correctly installed, observing the proper polarity (+ and -).
Attempt replacing the battery with a fresh one of the correct type (refer to the ‘Battery Type and Specifications’ section for details). If a new battery still doesn’t resolve the issue, inspect the battery contacts within the compartment for any signs of corrosion or damage. Gently clean the contacts if necessary.
In rare cases, the problem might stem from an internal malfunction. If battery replacement and contact cleaning do not restore power, contacting General Tools customer support for assistance is recommended. Do not attempt to disassemble the meter yourself, as this will void any warranty and could pose a safety hazard.
Inaccurate Readings
If the General MM9 provides readings that seem questionable, several factors could be at play. First, ensure the meter is properly calibrated. The MM9 auto-calibrates upon power-up, but manual calibration (detailed in the ‘Calibration Procedures’ section) may be necessary for optimal accuracy, especially in pinless mode.
Verify you’ve selected the correct material setting for the substance being tested (wood, drywall, cement board, etc.). Using the wrong setting will yield inaccurate results. Also, confirm proper contact in pin mode; pins must fully penetrate the material for a reliable reading.
Environmental conditions can also influence readings. Extreme temperatures or humidity may affect accuracy. Finally, ensure the target material is clean and free of surface contaminants. If issues persist, consult the troubleshooting section or contact General Tools support.